The allure of the weekend renovation warrior is hard to resist. You watch a fast-paced tutorial online, grab a hammer, and suddenly feel entirely qualified to rip open your walls.
But enthusiasm rarely translates into a code-compliant reality. We see homeowners across the United States diving headfirst into major renovations without grasping the fundamental science holding their houses together.
What starts as an attempt to save a few hundred dollars often morphs into a five-figure catastrophe. Nobody anticipates gutting their brand-new bathroom because a hidden leak rotted the floorboards beneath their feet.
Understanding basic mechanics separates a successful upgrade from disastrous DIY construction fails. If you ignore the rigid laws of physics and US building codes, your home will eventually make you pay the price.
We want to save you from that headache. When your house falls apart, the financial strain is immense, which is exactly why platforms like loanforphp.com exist to help people navigate unexpected repair costs.
Before you swing that sledgehammer or buy a blowtorch, take a step back. Let’s break down the absolute worst mistakes amateurs make so you can protect your property value and your sanity.
Plumbing Basics Gone Wrong: The Illegal S-Trap Illusion
The Hidden Danger Under Your Sink
Look under your bathroom sink right now. Does the pipe curve down, loop back up, and immediately plunge straight down into the floor like an “S”?
If so, you are staring at an S-trap. These were banned in US plumbing codes decades ago, yet they remain one of the most frequent home repair mistakes we encounter in DIY flips.
S-traps create a powerful siphon effect when large volumes of water rush through them. The falling water creates a vacuum, sucking the trap entirely dry.
Without a barrier of water sitting in that curve, toxic, highly combustible sewer gases vent directly into your living space. You might notice a horrific rotten egg smell lingering in the hallway.
What You Should Do Instead
Modern plumbing basics dictate the use of a P-trap connected to a properly vented line. A P-trap runs horizontally into the wall, breaking the siphon effect and keeping the water seal intact.
Last spring in Ohio, I inspected a basement renovation where a homeowner proudly showed off a sleek new vanity. They had hard-piped an S-trap directly into the concrete foundation.
Fixing that “cheap” weekend project required jackhammering the slab and installing a proper vent stack. It cost them thousands.
Never try to cheat gravity or air pressure. If you are moving plumbing fixtures, ensure a proper vent connection is installed before the drywall goes up.
Framing Errors That Compromise Structural Integrity
The Swiss Cheese Joist Disaster
Plumbing and electrical upgrades require routing pipes and wires from one end of the house to the other. To get there, you often have to navigate through solid wood floor joists.
This is where weekend warriors accidentally destroy their home’s structural integrity. You cannot simply grab a hole saw and bore massive pathways wherever it looks convenient.
Floor joists handle immense tension and compression loads. Cutting into the wrong section is mathematically identical to slicing halfway through a bridge support.
The Mathematical Rules of Wood
Building codes are extremely specific regarding notching and boring in load-bearing wood. You can never drill a hole in the top or bottom two inches of a joist.
Furthermore, you cannot cut a hole larger than one-third the actual depth of the wood. If you have a standard 2×10 joist, your absolute maximum hole size is roughly three inches.
I once walked into a flip house in New Jersey where the contractor needed to route a massive 4-inch PVC toilet drain. They cut huge notches directly into the bottom edge of three consecutive joists in the middle of the room.
The floor above felt like a trampoline, and the ceiling below was actively cracking under the stress. Fixing these severe framing errors required lifting the house with hydraulic jacks and sistering engineered lumber alongside the destroyed wood.
The Slow Leak: Mixing Copper and Galvanized Steel
Galvanic Corrosion Explained
Old homes in the US are heavily populated with threaded galvanized steel water pipes. When DIYers experience a leak, they naturally want to patch it with modern, reliable copper tubing.
They head to the hardware store, buy a few threaded fittings, and wrench the copper directly onto the steel. This looks watertight on day one, but an invisible chemical reaction begins immediately.
When dissimilar metals physically touch in the presence of an electrolyte like tap water, galvanic corrosion occurs. The copper acts as a cathode, effectively stealing electrons from the steel anode.
Preventing the Inevitable Flood
The galvanized pipe will rapidly rust, deteriorate, and eventually burst at the exact point of connection. It might take six months, or it might take two years.
But it will absolutely fail, usually at 3:00 AM while you are sleeping. This is a classic example of a repair that ruins an entire kitchen.
To bridge these two metals safely, you must use a specific part called a dielectric union. This fitting contains a rubber washer and a plastic sleeve that entirely separates the metals, stopping the electrical current dead in its tracks.
A dielectric union costs less than ten dollars. Ignoring it will eventually cost you a total kitchen rebuild.
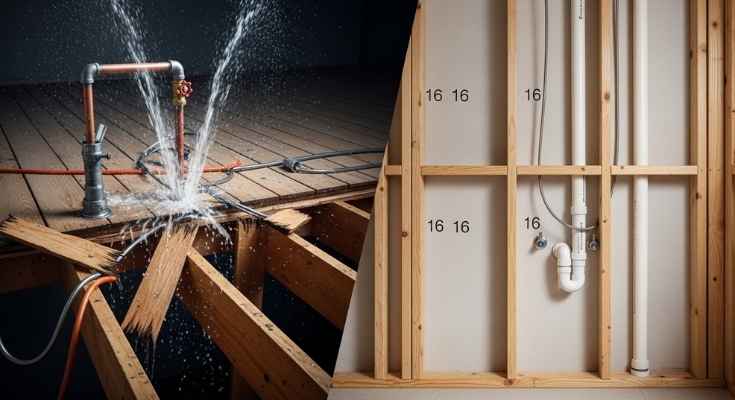
When 16-Inch Centers Become “Close Enough” Suggestions
Sagging Walls and Wasted Money
Standard American framing practices dictate that wall studs are placed exactly 16 inches apart, measured from the center of one board to the center of the next. This is not arbitrary.
Every sheet of drywall, plywood, and exterior siding manufactured in the US is designed to intersect perfectly with this 16-inch grid. Amateurs often ignore this measurement, placing studs wherever they “feel” like it or trying to stretch materials to 24 inches to save wood.
Winging your framing layout guarantees a catastrophic drywall installation phase. Your sheetrock edges will float uselessly in the air, missing the structural backing entirely.
The Ripple Effect of Bad Math
Even worse, altering the stud spacing drastically reduces the wall’s ability to support vertical weight. A roof relies on an evenly distributed load path traveling down through those carefully spaced vertical studs.
I consulted on a garage addition where the owner spaced his studs at 22 inches simply because he misread his tape measure. When the heavy winter snow arrived, the lack of structural integrity caused the roof ridge to sag visibly.
He had to rip down all the interior finishing, frame intermediate studs, and essentially build the walls twice. Measure meticulously, mark your plates clearly, and stick strictly to the 16-inch rule.
Suffocating Your System: The Unvented Drain Nightmare
Why Gurgling Drains Spell Trouble
People inherently understand that water needs pipes to flow out of the house. Very few realize that air must simultaneously flow into the pipes for the system to work.
Dumping water down an unvented pipe is like trying to chug from a plastic water bottle without letting any air inside. The bottle crushes inward, and the liquid stops flowing.
Amateurs frequently install new showers, sinks, or basement bars without tying into the home’s primary atmospheric vent stack. The resulting system struggles to drain, burps constantly, and smells terrible.
The Air Admittance Valve Workaround
When a drain lacks air, it aggressively pulls oxygen from the path of least resistance. Usually, this means sucking the water out of nearby P-traps, completely defeating their purpose.
If running a traditional PVC vent pipe through the roof is impossible, you are not entirely out of luck. Building codes often allow the use of an Air Admittance Valve (AAV), sometimes called a Studor vent.
This mechanical valve opens to let air in when water drains, then snaps shut to trap sewer gases inside. However, these valves must remain accessible for maintenance—you cannot bury them behind drywall. Always consult local codes, as some municipalities still forbid AAVs in new construction.
Wrapping Up Your Renovation Reality Check
Taking pride in maintaining your own property is a great American tradition. But blind confidence mixed with power tools is a recipe for disaster.
Every wall you open and pipe you cut carries a risk. Educating yourself on proper building codes, load paths, and plumbing mechanics is the only way to ensure your sweat equity actually builds value.
If you realize a project is out of your depth, swallow your pride and hire a licensed professional. If a previous botched DIY job has left you staring at a massive, unexpected repair bill, remember that financing options exist to help you fix it right the first time.
Check out loanforphp.com for resources on managing sudden home improvement expenses. Do the research, respect the structural limits of your home, and always pull the required permits.
Frequently Asked Questions
Why does my new sink smell like a sewer?
You likely have an S-trap installed, or your drain system lacks proper venting. Both issues cause the water seal in the trap to siphon away, allowing toxic sewer gas to drift up through your drain into the room.
Can I drill a hole in my floor joist to run a heavy gauge electrical wire?
Yes, but you must adhere to strict placement rules. Holes should be drilled precisely in the middle third of the joist’s height and depth to preserve its load-bearing capacity and avoid structural failure.
Is it safe to connect PEX tubing directly to copper pipes?
Yes, PEX and copper are not reactive in the way copper and galvanized steel are. You can safely join them using approved push-to-connect fittings, crimp rings, or expansion fittings without risking galvanic corrosion.
How far apart should framing studs be on an interior non-load-bearing wall?
Even if the wall isn’t supporting a roof, US standard spacing is 16 inches on center. This ensures standard 4×8 drywall sheets line up perfectly with the wood, preventing sagging and wavy walls.